Preparing and filing 1099 forms is a crucial task for any business owner. Failing to file them correctly can lead to IRS penalties. If you’re using QuickBooks, you can print Form 1099 in QuickBooks easily, provided you follow the correct process. In this guide, we’ll walk you through everything—from preparation to printing—so you can stay compliant and stress-free.
Why Printing 1099 Forms in QuickBooks Matters
1099 forms report payments made to independent contractors, freelancers, or vendors. Using QuickBooks ensures accuracy and saves time by automating calculations. By learning how to print Form 1099 in QuickBooks on your desktop, you can:
Avoid IRS penalties for late or incorrect filings
Maintain proper accounting records
Simplify the annual tax reporting process
Step 1: Verify Vendor Information
Before you start the print form 1099 in QuickBooks process, ensure that all vendor details are correct:
Go to Vendors > Vendor Center.
Select the vendor you want to issue a 1099 for.
Ensure their legal name, address, and Tax ID (TIN) are accurate.
Check the box labeled “Track payments for 1099” under vendor details.
Step 2: Set Up 1099 Preferences
Navigate to Edit > Preferences > Tax: 1099.
Click Company Preferences.
Select the correct tax year and specify your payment threshold (e.g., $600).
Map the accounts you’ve used to pay vendors to the appropriate 1099 boxes.
Mapping ensures QuickBooks calculates totals correctly for each vendor during the print form 1099 in QuickBooks desktop download process.
Step 3: Review Payments
QuickBooks allows you to preview which vendors will receive a 1099:
Go to Reports > Vendors & Payables > 1099 Summary.
Confirm that all eligible vendors and payments appear correctly.
Correct any discrepancies by adjusting vendor payment records.
This review prevents errors before the final printing stage.
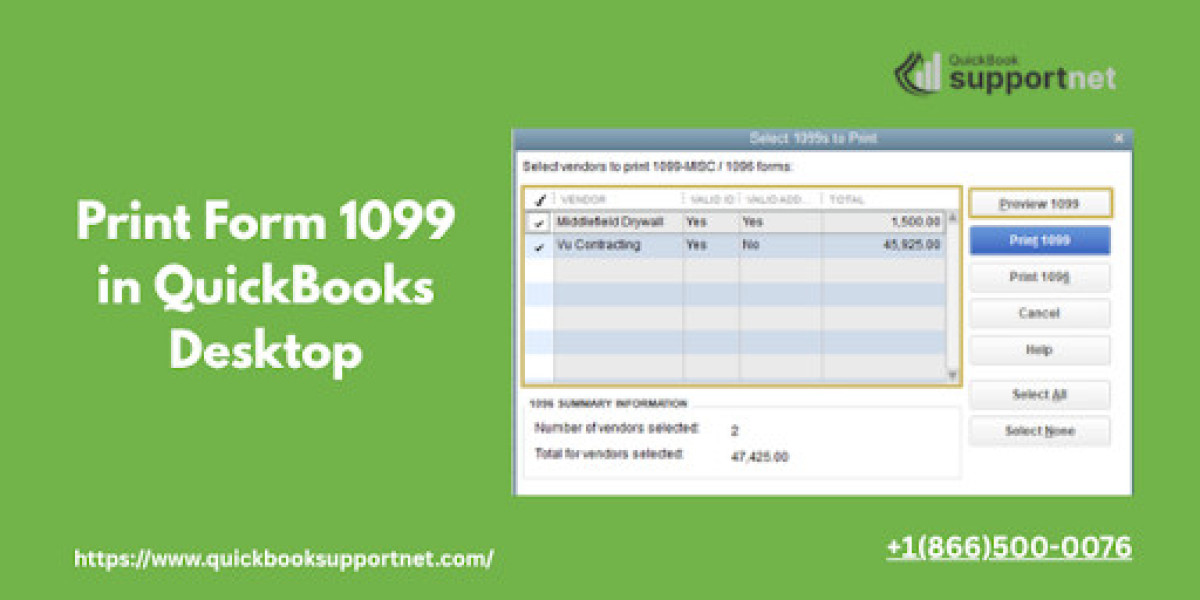
Step 4: Print 1099 Forms
After verifying your data, you’re ready to print form 1099 in QuickBooks:
Go to Vendors > Print/E-file 1099s.
Select 1099s for the correct tax year.
Choose Print 1099s to generate a physical copy for your vendors.
Use the official IRS 1099 form (not a plain paper printout) to ensure complianc
Step 5: Filing with the IRS
Mail the printed 1099s to vendors by January 31.
File with the IRS by February 28 (paper) or March 31 (electronically).
Retain a copy for your records in case of audits.
Following this process ensures accurate reporting and avoids late fees.
Common Errors When Printing 1099 Forms
Missing TINs or addresses
Incorrect account mapping
Payments below IRS thresholds
Using plain paper instead of official forms
QuickBooks provides warnings for most of these errors, but double-checking is always recommended.
FAQs
Q1: Can I print 1099 forms in QuickBooks Desktop without errors?
Yes, by verifying vendor info, mapping accounts, and reviewing payments, you can print 1099s error-free.
Q2: How do I download the QuickBooks 1099 form for printing?
Go to Vendors > Print/E-file 1099s > Print 1099s, and QuickBooks will format the form for printing on official paper.
Q3: Can I e-file 1099s directly from QuickBooks?
Yes, QuickBooks supports e-filing, but printed copies may still be required for vendors.
Q4: What if I find an error after printing 1099s?
You’ll need to correct the vendor information and print a corrected 1099 using QuickBooks’ correction feature.
Q5: Who can I call for QuickBooks 1099 support?
For expert assistance, call +1(866)500-0076 for immediate guidance.
Read More:- https://appsupportlocal.com/read-blog/29344